Thursday, July 5, 2012

SINGAPORE Vacation...

 SINGAPORE VACATION TIME!! 5 Days 4 Night... with hubby.. and best friends, who also a couple (Ferdi and Erlin)... Here's some of the pictures and stories...

Waiting for Boarding (tried to smile although i hate flying T_T)
arrived at Changi Airport yayyyyy ! (i know my face in the photo didn't show a happy face but i really really happy.. REALLY! ... yeah well.. hahaha... why do i have to act cool in every photo? sigh...)
The next day we were going to Universal Studio wohoooooo !!! whoop whoop..

At the main entrance...
                                        
Corn Dog for each of us hahaha...

 in front of The Pantages Hollywood Boulevard's replica..

Chilling with Erlin at New York's sidewalk replica..

in front of The New York Public Library's replica..


To summarize the experience that i have in Universal Studio...  The Fee Ticket is 70 SGD / person, and if you hate long queue for every ride, you could add another 50 SGD / person for express route (that's what i did, and i glad i did that, no queue at all and i had chances to get on all the ride in 1 day.. I know 50 SGD not cheap but it was worth it..)

My Favourite Ride would be: 
* Transformers The Ride : we experienced 3D and action with storyline in the same time.. I'm a BIG FANS of Transformers and childish i know but i felt like they REALLY talked to me, they even tried to rescue me, how cool was that hahaha.. 
* Battlestar Galactica Duelling Roller Coaster : this is a very famous ride.. they said this is the world's tallest pair duelling roller coaster.. If you LOVE a thrilling adrenaline pumping ride, this is for you hahahaha... (here's my tips : take the Red "Human"side for the start... if you think you need more challenge.. I'm cheering you to hop on to the Blue "Cylon" side...)

take photo in front of our favourite ride, The Battlestar Galactica Duelling Roller Coaster...
Overall, i think it was better than my Disneyland's Hong Kong experience.. maybe because Universal has more ADULT ride than Disneyland.. So if you wanna bring your kids to a theme park, i suggest Disneyland.. But if you still on a honeymoon feeling like us hahahaha go to Universal Studio ^^

After Universal Studio, all I do the next days was hanged out at Orchard area and eat hahaha... 

This is me shopping in Sephora at ION Plaza..
Nothing too special about it.. just the regular.. so we could skip it..

But there was something excited and for me this is the next best thing about Singapore that i wanna blog about.... Its the hotel i stayed, the famous Marina Bay Sands....

Our hotel so uniquely magnificent at the day time...
and OMG so grand at night (the ship shape at the top of the building is the famous 57th floor sky park infinity pool..)
I took this photo from some tourism website.... i know i should put courtesy for the web but i took this photo before my vacation so i kinda forgot the web name huhuhu.... sorry.... from the photo, you see its kinda empty and intimate.. 

This is the reality photo at noon around 12 pm where the sun HIT US NASTY.. so less people.. But if you wait again a lil' bit till' afternoon.. don't be surprise, it will be chaotic and not comfortable to swim because too much people passing by.. kinda like circus hahaha.. For you guys who love intimate and more private place, well this pool not it, except maybe you want to swim in the midnight tee hee? i wonder if they still open? hmmmm.....

 with hubby in the pool ^^

4 pm in the afternoon.. chaotic.. even to take a photo we must take a few shot to make sure theres nobody else in the photo... 

YAY finally.. one photo without someone in it too....

Night Photo... The breathtaking city view with all the lights...


Last photo of me in the pool.. I swear..

This is the picture of the room where i stayed.... I ordered for a double bed, but when we got there it was full.. To make it up, they gave us the twin bed but with city view without additional charge ^^


City View Room

Camwhoring in the room

 capture with my Blackberry

Hello Kitty Blackberry =p


View from our room.. Singapore Flyer in the afternoon.. great job, Hun.. very beautiful.. ^^

LAST thing, what I also LOVE about Marina Bay Sands is that they also have a Mall, a small Ice skating rink, Museum, two large Theaters, seven "celebrity chef" restaurants, Casino with 500 tables and 1600 slot machines.... all in one area... Its so close, Its only a few step from our hotel room... i didn't feel the need to step out because i had all i need... the Food Court in the mall also had various menu and not too expensive.. Here's some of them..

 Bakuteh..

steamy Dim Sum..

Nasi Lemak..

at Marina Bay Mall (British India Outlet)

at Marina Bay Mall

at Marina Bay Mall

and... another Sephora visit.... 

That will be all for my Singapore Vacation update... Im having fun writing this, and i hope you enjoy reading it too ^^

Tuesday, June 5, 2012

MAKE UP SHOW Brush Guard....

I recently just purchased MAKE UP SHOW Brush Guard (IDR 50.000 / around 5$ US) from Makeuptoolshop.com ... Its actually my first purchase from "Make Up Tool Shop" and i am quite happy.. It came quick just around 2 days after my payment....

By the way i understand that in my country, Indonesia, there's still just a few people know what Brush Guard is.. So I'm gonna explain it very short & quick. I red that Brush Guard is very popular nowadays in US, coz it could prolong the life of our brushes and also keep brushes in a good shape.. To keep it simple, we all know that make up brushes are not cheap, and when we spent money on them, we want them to last very long time.. So i decided to bought this tools soon as i see a great deal..

So here's how mine looks.....
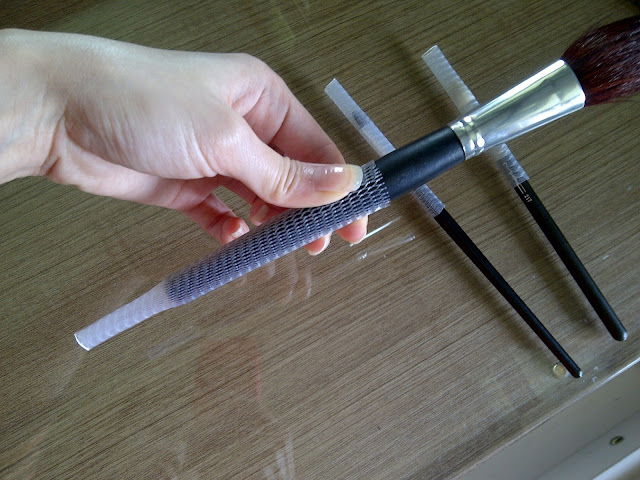
Its wrap in a plastic case...

Contains: 5 LONG & 5 SHORT Brush Guard

To tell you the truth, i always kinda lazy to clean my make up brushes... yeah, guilty as charge... I know it contain dirt and bacteria.. and YES, i also know it will be bad for my skin to use a dirty brush... But i really2 hate cleaning my brushes *crying*....

Why? Not because I'm really2 lazy like "Shit i don't want to waste my time cleaning brushes" ..... NO... But make up brushes kinda expensive.. and i hate how washing it make the bristles fly away and make my brushes not in shape anymore T_T If i don't wash it, I am keeping the shape.. but If i don't wash it, I'm ALSO gonna keeping the germs and dirts.. BIG dilemma...

So, yesterday i put this Guard to the test for the first time.. I cleaned my MAC Brush 217 and also my 2 drugstore brushes (blush brush and shadow brush)....

This is how my brushes looks after cleansing... they were still wet...
You could see that my MAC 217's bristles kinda flying away everywhere..
The Blush brush also have a few hair out of place...

 Start from the 217.. Since this is just a blending brush, I put on the SHORT guard.. i start to put it on from the bottom handle, and push it to the bristles... 

ZOOM on the 217's bristles... look they were not in a good shape after i cleaned it

Done! Now this Brush Guard gonna hold the bristles..
I also did the same with my drugstore shadow brush....

 For the big blush brush.. i used the LONG Brush Guard.. also the same, We have to ALWAYS push it from the handle to the bristles..


 DONE... Now lets air dry it..
(IMPORTANT: Don't ever hairdryer your brushes, just let it air dry naturally..)
 (ALSO IMPORTANT: Brushes have to FACING DOWN when we air dry it, so the water and moisture wont running in to the roots and weaken the glue.. it will shorten the life of our brushes)

This is how i air dry my brushes... I used Drying Rack and an elastic band (yeah.. yeah.. hahahaha....)

Let it in this upside down position until completely dry... Small brushes only needs 1 day to dry.. But larger brush like very dense kabuki brush or blush brush usually take me about 2 days.. If you want to speed it up, put it in a room with air conditioner ^^

So here THE FINAL DRY RESULTS:
(sorry the photo kinda dark.. i took it at night with bad lighting..
I am never been happier ^^ My brushes looks like new.. no fly aways.. no bad shape.. woohoooo... *dancing*......

PROS: 
- Great for after cleansing brushes.. to put the brushes back to the real shape..

CONS:
- people said it good for travelling also to keep the brushes shape.. but i honestly hate using brush guard for travelling.. because after a long journey in my brush case and after a few shaking.. the hairs got stuck in the holes and damaged the bristles.. SO i DON'T recommend travelling with it..

OVERALL:
- I like using brush guard, and definitely happy to use it every time after i wash my brushes to make it looks like new again.


Saturday, April 14, 2012

Blue & GLitter Nail Art Turtorial...

FINAL RESULT:
Blue & GLitter Nail Art

**********************************************************************

THINGS I'VE USED :

LEFT to RIGHT:
1. any Matte Milky Blue Nail Polish will do just fine
2. The Face Shop Dark Blue Nail Polish (code: BL-604)
3. Etude Mini French Silver Glitter
4. BNC Clear Nail Polish for Top Coat

I ALSO USED:

2 pcs 2mm Silver Rhinestone
2 pcs 3mm Silver Rhinestone
a Dotting Tool

**********************************************************************

STEP BY STEP GUIDE:

1. Paint  our Ring Finger (Jari manis) with a Face Shop dark blue polish (or any shiny dark blue polish will do just fine).. and all our other nail with milky blue polish... Let it dry... add 2-3 layer if necessary... Let it dry...


2. Now take Face Shop Dark Blue again... We planning to make two line on each nail.. These two line gonna have different wide.. One line gonna be thinner than the other...

 Lets make the wider line first ......


 Apply 2-3 layers......
DONE one line....

Then a little bit to the right, make one thinner line....

 (I'm sorry a little Blur there T_T)

Did you see that i make a little mistake.. i should made a straight Dark Blue line but my arm kinda shaky so the brush glitch, and leave an uneven straight... BUT its okay... this when the Etude glitter polish came to save the day.....

3. This Etude Mini french has thinner brush (not like regular polish brush).. so we could make a thin line very easy.. great for nail art purposes ^^ .... so what I'm gonna do, i line all the outer line of the Dark Blue polish...

this trick not only gonna make our nail art much Glam & Blingy.. BUT ALSO MAKE OUR UNEVEN APPLICATION COMPLETELY COVERED...


 YOU SEE THAT.. my 'little mistake' instantly covered.. tee hee =p

4. Now you remember our ring fingers? we already painted them Dark Blue.. Now give top coat on the part where we gonna put rhinestones..


5. Now take a toothpick, or a pencil, or in my case a dotting tool.. and dot the pointy end to the clear polish..


with that we could pick up the rhinestone easily..
tap the doting tools to a 3mm SILVER Rhinestone...


and place it at the middle end of our nail...


take another smaller (2mm) rhinestone... and place it under the 3 mm one...

  
Then give all of the nail one good layer of top coat / clear polish....
and FINISH...


**********************************************************************

RESULT:


Remember that you could always use any color you have.. Its not always have to be Light & Dark Blue like mine.... Be Creative.. 

Practice makes Perfect 
Hope this tutorial HELPS ^^
Related Posts Plugin for WordPress, Blogger...